Window Composition
Wiimote Checker consists of two windows.
 |
Wiimote Connecter
Launches first. |
 |
Wiimote View
It will open when you select Wiimote at Wiimote Connector. |
Operation with Wiimote Connector
Basic Operation Flow
- Pairing the new Wii Remote.
- If we succeed, Wiimote icon will appear in the list.
- Select the icon and click Open Wiimote View button to open Wiimote View.
- Inspect the Wiimote (see instructions for Wiimote View).
- Once the inspection is complete, unpair Wiimote.
- Repeat this.
Command Menu
| This means the Wiimote View is closed.
Click to open the Wiimote View. It will not open unless you select the Wii Remote in the list. |
|
| This means the Wiimote View is open.
Click to close the Wiimote View. |
|
| Attempt to pair the NEW Wiimote.
At the same time, press the Sync button on the Wiimote. If the pairing is successful, Wiimote icon will be added to the list. |
|
| Attempt to pair the unpaired Wiimote again.
Run it after selecting a unpaired Wiimote in the list. |
|
| Attempt to unpair the Wiimote.
Run it after selecting a paired Wiimote or a disconnected Wiimote in the list. |
|
| Cancel the pairing/unpairing process.
If the process is not completed in 30 seconds, it will be canceled without pressing the cancel button. |
|
| Opens the settings.
There are currently no settings for this software, so open the manual’s web page (this page) instead. |
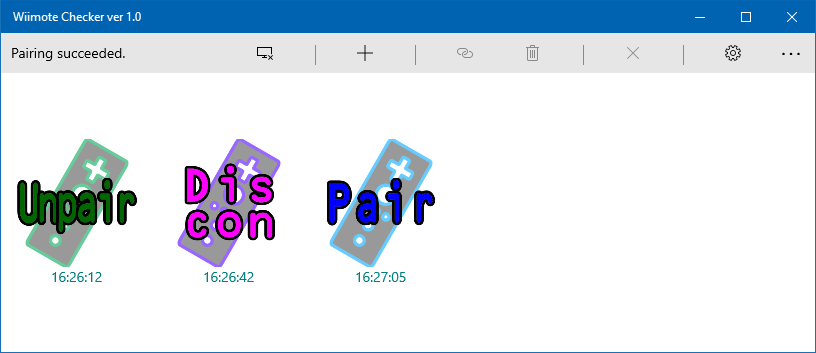
Wiimote Icons
 |
Newly Added Wiimote
Discovered and not yet paired. Change to a paired state soon. |
 |
Paired Wiimote
This is the only state in which information can be displayed in the Wiimote View. |
 |
Unpaired Wiimote
You can also re-pairing them. It will be removed from the list over time. Once a Wiimote has been removed, it must be re-paired anew. |
 |
Disconnected Wiimote
This is a Wiimote that has been disconnected in the pairing state, for example, because the battery was removed before unpairing. You cannot re-pair in this state, so please unpairing once. If you don’t unpair, it will remain in the Windows device list. |
Points
- In disconnected state, please unpair once.
- If the pairing has not been established within 30 seconds, it will be canceled and you should try again.
- When multiple Wiimotes are paired, you can switch the Wiimote to be displayed in the Wiimote View by selecting it in the list. At this time, all LEDs will light up on the selected Wii Remote, making it easy to distinguish between them.
Operation with Wiimote View
Basic Operation Flow
- Pair the Wii Remote with the Wii Remote Connector and select it to open the Wii Remote View.
- After the Wiimote View shows the status of the Wiimote in detail, please inspect the operation of the Wiimote.
- Once the inspection is complete, press the Unpairing button on the Wiimote View to unpair.
- Use the Wiimote Connector to pair and select the next Wiimote to display the information in the Wiimote View.
- Repeat this.
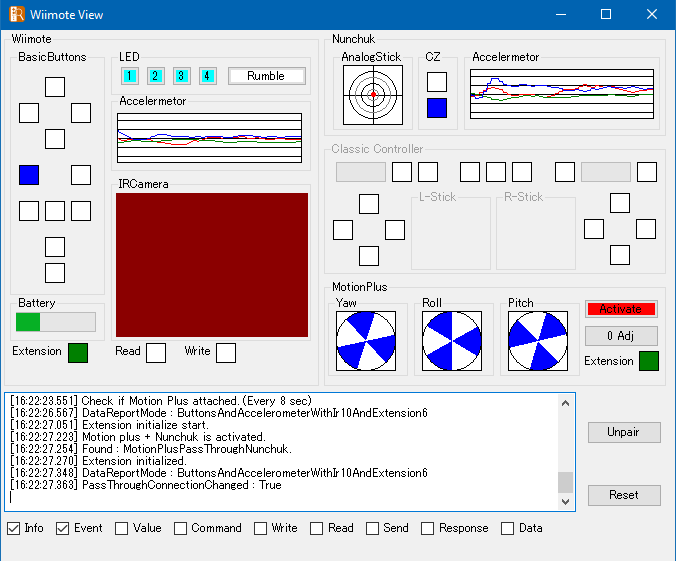
Functions and Operation
Points
- Automatically connects to the selected Wiimote in Wiimote Connector.
- When switching connections, Wiimote will momentarily rumble and all LEDs will light up.
- It is automatically detected if a supported expansion controller is connected.
- The Motion Plus connection is checked every 8 seconds, except when switching.
Screens and Features
 |
Displays the status of the D-Pad and buttons. The displayed position corresponds to the position of most of the buttons.
When chattering (instantaneous on/off due to poor contact) is detected, it will be fixed with Red. To clear the warning, press and hold the appropriate Wiimote button. |
| Remaining battery level indicator. | |
This button is used to display the status of the LEDs and to switch between them.
When you press the button, a status change request signal will be sent to the Wiimote. After receiving a notification of the changed LED status, the button will switch colors. All LEDs are lit when switching the Wiimote to display. A Wiimote that is off the display will change to only turn on 1 and 4 on both sides. |
|
This button is used to display the status of the Rumble and to switch between them.
When you press the button, a status change request signal will be sent to the Wiimote. After receiving a notification of the changed Rumble status, the button will switch colors. When switching the display Wiimote, it is vibrating for a moment. |
|
 |
This graph shows the status of the acceleration sensor in a time series. The line color of the graph corresponds to each axis of acceleration. |
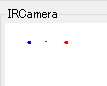 |
Plots the information from the IR camera. The positions of up to four complementary detected objects are displayed as four colored dots.
The green dot indicates the center position calculated from the position of the detected object. If two or more objects cannot be detected, the background is displayed in dark red. |
Displays the connection status of the extension controller.
When chattering (instantaneous on/off due to poor contact) is detected, it will be fixed with Red. To clear the warning display, click with the mouse. |
|
| This is the display of the internal memory and register read/write occurrences. | |
 |
Plots the state of the analog stick. |
| Displays the status of the trigger button.
The green bar shows the trigger and the button indicator on the side shows the click when you push it in. |
|
 |
Displays the status of the gyro.
Displays the direction of Motion Plus for each of the three axes (yaw, roll, and pitch). |
This button is used to display the status of the Activate and to switch between them.
When you press the button, a status change request signal will be sent to the Wiimote. After receiving a notification of the changed Activate status, the button will switch colors. The connection status of Motion Plus will be examined every 8 seconds. |
|
| 0-Adj for motion plus.
If you hold the Wiimote still and press this button, it will adjust the current orientation as a zero reference. |
|
 |
There is an area for displaying the log and a row of switches to select the type of log to be displayed there. The log types are lower level data from left to right.
If all items are turned on, the window may become less responsive. |
| Switch to the Wii Remote Connector and unpair the current Wiimote. | |
| Reset the Wiimote View and initialize the Wiimote.
This operation may be used to recover from a display malfunction. |
Bluetooth Adapter Settings
Bluetooth Adapter Support
We assume that they are compatible with the most common adapters.
The products we have tested are listed below.
- iBUFFALO Bluetooth USB adapter 3.0 BSHSBD04BK
- Zexmte Bluetooth 4.0 USB adapter
Driver Installation and Configuration
Basically, it can be used with a plug-and-play setup installed.
As for the driver, use “Generic Bluetooth Radio” and “Microsoft Bluetooth Enumerator” which is installed by default.